When I want to know how well my HVAC system is working, smart thermostats and ad-hoc checks don’t get me as far as I’d like. That means it’s time to create an entire system to monitor that information and present it graphically. This is normal, right?
Requirements
Overall, I didn’t want to spend much money on this. Yes, time is money, blah blah blah. Learning new tech offsets the cost of time, and it’s a better use of late-night chill time than playing a game anyway. Plus, spoilers… there are graphs. That broad overview gave me the following criteria:
- Don’t buy much extra stuff. Keep it less than $20 spending.
- Easy to set up and keep running.
- The initial scale is one sensor. Don’t optimize until later, if ever.
Choices, Choices, Choices
Selecting the brains
I have a box of microcontrollers in my project area. First, I was going to use a BeagleBoard that I got ~10 years ago at the Embedded Linux Conference. However, I could not find a power adapter for it, so after 20 minutes of searching, I nixed that idea.
I considered using a raspberry pi, but even though I have a couple spares, I didn’t want that level of overkill to get a couple temp readings sent to the cloud.
Oh, but the handful of Arduino Ethernet boards that have PoE? Yes, please. It takes care of my need to plug into power (sort of, we’ll cover this later). 32k of memory should be fine (yeah, we’ll touch on this later too). The temp probes that I have will work fine with this and require minimal breadboard work.
Selecting the sensors
This took no time. I needed something I could insert into holes in our ductwork that our HVAC guy cut several months ago. I wanted to use these since it meant that it would get readings from the same place they do for efficiency checks, and I could do less permanent damage to our HVAC system.
I also had two DS18B20 sensors laying around from a forgotten project. They are waterproof with long enough cords to work well around the furnace. As a bonus, they use a digital signal so I could use a couple of them on the same input on the arduino without worrying about collisions. This would be really handy later.
Selecting the backend tooling
I wanted to use MQTT for sensor communication so that I wasn’t creating my own protocol. There are a lot of alternatives that I never even considered using. Why? I know people who use MQTT at work. The availability of resources to sanity-check my work meets my goals for #2 really well.
Database and visualization were chosen via similar criteria. I’ve used Grafana a lot recently to create dashboards, and there’s a free cloud version that gets me through proof-of-concept. Same deal with Timescale. The additional benefit of these technologies is that I can spin up instances at home for free later if I want to keep this party going. Or, I can decide to pay for the fully-managed versions in the cloud. This is a problem for future me and I’m good for now with what I have.
Sensor Development
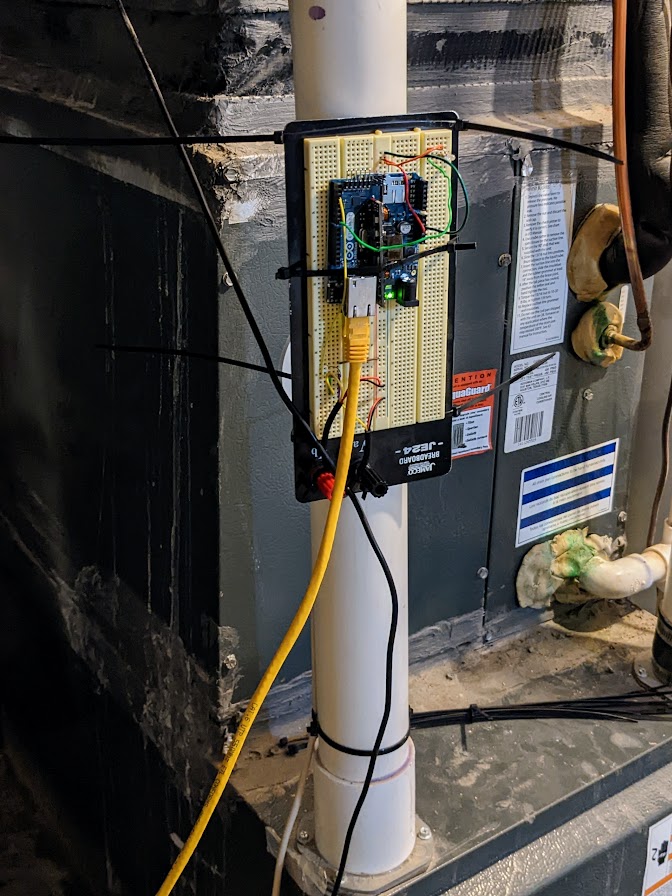
Wiring the Parts Together

The sensor hardware itself was planned to be as plug-and-play as possible. I added an LED later to see flashy lights. It adds very little value since I am not spending much time in the room where this lives. The LED functionality isn’t even in the code I walk through below as it’s there as a debug tool more than anything, but I may update that source code later if I decide to leave it in.
Sensor Programming
I started with the sensor ready and no real design. Was this a mistake? Yes. Would I do it the same next time? Also, yes.
Honestly, the project software is fairly simple so skipping the design meant that now I need to redo a few things to get my data structured better and clean up a few edge cases for failures. It works as is, but it’s not pretty. Warts will be highlighted as we go. Grab the popcorn and follow along on the journey!
Initially, I had planned to set up TinyGo and program the boards that way. I have not used TinyGo before. As of this post, I still have not used TinyGo. Arduino provides a web editor for creating sketches and installing them on boards with a minimal tool download. This was easy. See #2 criteria for information on why I went this route.
I tackled the sensor programming in the following order:
- Get temp readings working
- Get the network connection working
- Get MQTT communication working
- Send temp readings via MQTT
Reading in temps
Fortunately, there’s already an arduino library for the sensors I used. I only needed to include OneWire.h and DallasTemperature.h for the software to function. I found a reference on wiring up multiple sensors that worked right away. In an hour or so, I had the following:
// OneWire - Version: Latest
#include <OneWire.h>

// DallasTemperature - Version: Latest
#include <DallasTemperature.h>

#include <SPI.h>
#include <Ethernet.h>

// hardware config
#define ONE_WIRE_BUS 2

OneWire oneWire(ONE_WIRE_BUS);
DallasTemperature sensors(&oneWire);

// take reading every 60s
const long interval = 6000;
unsigned long previousMillis = 0;

int count = 0;

void setup()
{
  // Useful for debugging purposes
  Serial.begin(9600);
  while (!Serial) {
    ; // wait for serial port to connect. Needed for native USB port only
  }

  sensors.begin();
}

void loop()
{
  unsigned long currentMillis = millis();

  if (currentMillis - previousMillis >= interval) {
    Serial.print("Sensor loop #");
    Serial.println(count);

    // save last time message sent
    previousMillis = currentMillis;

    // Get temp(s)
    sensors.requestTemperatures();

    int temp_count = sensors.getDeviceCount();
    for (int i = 0; i < temp_count; i++) {
      Serial.print("Reading temp #");
      Serial.print(i);
      Serial.print(": ");
      Serial.println(sensors.getTempCByIndex(i));
    }

    Serial.println();

    count++;
  }
}
Running this code, I was getting two readings every minute… oops. No, every 6 seconds. It’s helpful to remember that arduino tracks “time” in milliseconds. My math was off, but it was fine here. I fixed that and moved to the next area. The next area was not connecting to the network. Instead, I distracted myself by tweaking the output.
JSON
I realized that parsing a message with unstructured text would be a pain. I had not done design, remember, but I was getting a tickle in my head where I knew that moment would arrive soon. I substituted some long, solid engineering planning with a spur-of-the-moment design that later would prove to be insufficient.
Nobody wants to write JSON with print statements though. No, you don’t. Stop. There’s a library for that too. I still have more than half my program space left on the board at this point; no worries. Plus, ArduinoJson has a nice example I could borrow from.
I can just include ArduinoJson.h and ArduinoJson.hpp to create a serializable variable for json. This would be awesome when I got around to adding MQTT. But I didn’t know that yet. I was just going to print it to the console. It just needed a few tweaks to the code.
First, add some const char * variables for the json keys. Doing this statically means that the JSON object can be smaller since the library will link to those instead of trying to store them separately.
const char readingKey[] = "reading_idx";
const char tempsKey[] = "temps";
Next, create the JSON document and populate it. BUT… this is static, so I needed to use a tool (from the same place that created the library) to calculate the size I’d need. This worked well. I did it wrong later, but it worked well. Eventually, I added more strings and some were dynamic. I never updated this value. It will probably have memory issues at some point. Sorry, future-me!
// Use arduinojson.org/v6/assistant to compute the capacity.
StaticJsonDocument<48> doc;
doc[nameKey] = name;
doc[readingKey] = count;

JsonArray data = doc.createNestedArray(tempsKey);

int temp_count = sensors.getDeviceCount();
for (int i = 0; i < temp_count; i++) {
  Serial.print("Reading temp #");
  Serial.println(i);

  data.add(sensors.getTempCByIndex(i));
}

serializeJson(doc, Serial);
Networking (oops, also everything else)
It’s a very good idea to change one thing at a time. I am quite capable of identifying that as a best practice. I am not as skilled when I need to actually follow my own advice. When I added network support. I simultaneously added MQTT as well. I lucked out that none of it is that difficult or complicated. It worked on the third or fourth try. Most issues were with me doing dumb things when I tried to verify communication; not in the actual sensor code itself.
The final code (which is running on my sensor right now) is as follows:
```arduino
// ArduinoJson - Version: Latest
#include <ArduinoJson.h>
#include <ArduinoJson.hpp>

// OneWire - Version: Latest
#include <OneWire.h>

// DallasTemperature - Version: Latest
#include <DallasTemperature.h>

// ArduinoMqttClient - Version: Latest
#include <ArduinoMqttClient.h>

#include <SPI.h>
#include <Ethernet.h>

// hardware config
#define ONE_WIRE_BUS 2

OneWire oneWire(ONE_WIRE_BUS);
DallasTemperature sensors(&oneWire);

// Set your MAC address
byte mac[] = { 0x90, 0xA2, 0xDA, 0x00, 0x95, 0x0F };

const char name[] = "90:a2:da:00:95:0f";

const char nameKey[] = "name";
const char readingKey[] = "reading_idx";
const char tempsKey[] = "temps";


const char broker[] = "test.mosquitto.org";
int        port     = 1883;
const char dataTopic[]  = "Hotpants/data";

// take reading every 60s
const long interval = 60000;
unsigned long previousMillis = 0;

int count = 0;

// Ethernet and MQTT related objects
EthernetClient ethClient;
MqttClient mqttClient(ethClient);

void setup()
{
  // Useful for debugging purposes
  Serial.begin(9600);
  while (!Serial) {
    ; // wait for serial port to connect. Needed for native USB port only
  }

  // Start the ethernet connection (DHCP)
  Serial.print("Attempting to connect to network");
  while (Ethernet.begin(mac) == 0) {
    // failed, retry
    Serial.print(".");
    delay(3000);
  }

  Serial.print("You're connected to the network. IP address = ");
  Serial.println(Ethernet.localIP());
  Serial.println();

  // Attempt to connect to the server
  Serial.print("Attempting to connect to MQTT broker: ");
  Serial.println(broker);

  if (mqttClient.connect(broker, port))
  {
    Serial.println("Connection established");
    Serial.println();
  }
  else
  {
    Serial.print("MQTT connection failed. Error code = ");
    Serial.println(mqttClient.connectError());

    // block if unable to establish connection
    while (1);
  }

  sensors.begin();
}

void loop()
{
  // This is needed at the top of the loop!
  mqttClient.poll();

  unsigned long currentMillis = millis();

  if (currentMillis - previousMillis >= interval) {
    // save last time message sent
    previousMillis = currentMillis;

    // Get temp(s)
    sensors.requestTemperatures();

    // Use arduinojson.org/v6/assistant to compute the capacity.
    StaticJsonDocument<48> doc;
    doc[nameKey] = name;
    doc[readingKey] = count;

    JsonArray data = doc.createNestedArray(tempsKey);

    int temp_count = sensors.getDeviceCount();
    for (int i = 0; i < temp_count; i++) {
      Serial.print("Reading temp #");
      Serial.println(i);

      data.add(sensors.getTempCByIndex(i));
    }

    Serial.print("Sending message. Topic = ");
    Serial.println(dataTopic);
    serializeJson(doc, Serial);

    // send message
    mqttClient.beginMessage(dataTopic);
    serializeJson(doc, mqttClient);
    mqttClient.endMessage();

    Serial.println();

    count = (count + 1) % 128;
  }
}
There are a few issues that I need to address.
- If the MQTT connection dies. You have to manually restart the sensor. This is not ideal.
- The mac address, broker, topic, etc. are all hardcoded in the sketch. This is annoying if I want to change anything. I have to disconnect the sensor from the furnace area, bring to my desk, reprogram and take it back. I have some small microSD cards to use and create a config to read in some values, but that’s for a later enhancement.
- I’m running at about 90% program space used. Adding other functionality may require some optimization.
- I never send any information about the sensor itself via MQTT. This would be helpful for later use (mac address, sensor type, etc.)
- The biggest problem… I’m sending the temps in Celcius. Normally fine, but I want to see the HVAC Evaporator temp delta in Fahrenheit. I convert this later, but that’s dumb. I will change this very soon.
- It’s annoying, but I am taking readings if the furnace is on or off. I don’t really care what the readings are when it’s off. They are meaningless. So I will need to add in a different mechanism to detect if the furnace is turned on and send readings then. I have a few ideas on how to do this but haven’t done any further work than that.
Backend Development
MQTT Broker
I started off by using test.mosquitto.org and realized it works fine for what I’m doing now. I will eventually change this to be hosted locally, but not now. It works well enough for who it’s for (that’s me, btw).
Timescale
I was going to do this locally. I installed postgresql on my linux server. I’m not including what I did for that because I haven’t used it at all. I created a Timescale Cloud account and which is free for 30 days. In a month, I’ll check to see how much that would cost me to avoid maintaining it locally. The setup with their instructions had me up and running within 20 minutes. A+ rating from me so far.
Grafana
Another free trial instance that is sufficient for what I need in a proof-of-concept. I will probably use a local instance here eventually, but it’s working as is for now.
Service Development: The Glue (aka shortshorts)
I briefly looked to see if there was a handy service that would take my MQTT data and magically put it into Timescale. No luck. Some things sorta do that. But I haven’t done any projects in Go that have networking, async communication, or contexts. Let’s roll up our sleeves and figure out 50% of the battle GI Joe was talking about.
As a brief aside… The name “shortshorts” has very little meaning to this project. I needed a name for the MQTT topic and had chosen “Hotpants” as it seemed funny at 1am when I was developing that part. I didn’t want the topic and this service to be named the same, but I wanted them to share a theme. Nothing further; no hidden meanings.
My first pass at a go application to stitch this all together was simplistic. It connected to MQTT and printed the sensor data to the console. There was no lipstick on this pig. I pulled the majority of the code from a couple examples found on GitHub and elsewhere.
Once I had that working, I needed to get it into Timescale. Now I must tell you how much I love Timescale for their documentation and examples. I could take almost everything I needed from their Go Tutorial.
I had everything crammed into main.go and it worked. I didn’t want to share that code with anyone at that point though. Time to make this more like a service, I thought. Hours passed. I ate a Thanksgiving meal and the leftovers. I had a hot mess of packages and channels; partially working, but nothing looked right. Time to use a lifeline and call a friend. One hour with Jack, and it looked really good. There are still warts, but they are self-inflicted and I’m ok with them for now.
Application Code Highlights
All of the go application code is available on GitHub.
The application flow starts in main (this should not be the interesting part of what I’m saying). I set up some contexts to help everything shut down nicely when it’s time, and make all the needed connections before I split off a thread for processing data. That all gets wrapped up with some shutdown logic and we have a decent core to build upon.
func main() {
  ctx, cancel := context.WithCancel(context.Background())

  tsdb, dstream, client := start(ctx)

  go processLoop(ctx, dstream, tsdb)

  servicemanager.WaitShutdown(func() { shutdown(cancel, tsdb, client) })
}
The processing function loops forever until the context completes. Otherwise, it is reading data from the MQTT data stream channel.
func processLoop(ctx context.Context, ds chan [2]string, tsdb *timescalewrapper.Database) {
  for {
    select {
    case <-ctx.Done():
      return
    case d := <-ds:
      logger.Info("received sensor data", zap.String("topic", d[0]), zap.String("payload", d[1]))

      var reading timescalewrapper.SensorData

      err := json.Unmarshal([]byte(d[1]), &reading)
      if err != nil {
        logger.Error("unmarshalling payload", zap.Error(err), zap.String("payload", d[1]))
      }

      logger.Debug("unmarshalling payload", zap.Any("reading", reading))

      err = tsdb.InsertData(reading)
      if err != nil {
        logger.Error("inserting data", zap.Error(err), zap.Any("reading", reading))
      }
    }
  }
}
I also ended up using viper to pull configuration from a file. I could have used environmental variables or CLI arguments; I may still end up with either of those. Putting that in a simple YAML document is easy and works well. No more putting sensitive data into my source code. There’s no validation here and it feels like a kludge. It’s a TODO for later.
func readConfig() string {
  viper.SetConfigName("config")
  viper.SetConfigType("yaml")
  viper.AddConfigPath(".")

  err := viper.ReadInConfig()
  if err != nil {
    logger.Panic("reading config file", zap.Error(err))
  }

  var sb strings.Builder

  sb.WriteString("postgres://")
  sb.WriteString(viper.GetString("timescale.user"))
  sb.WriteString(":")
  sb.WriteString(viper.GetString("timescale.password"))
  sb.WriteString("@")
  sb.WriteString(viper.GetString("timescale.host"))
  sb.WriteString(":")
  sb.WriteString(viper.GetString("timescale.port"))
  sb.WriteString("/")
  sb.WriteString(viper.GetString("timescale.database"))
  sb.WriteString("?sslmode=")
  sb.WriteString(viper.GetString("timescale.sslmode"))

  return sb.String()
}
In the MQTT package, I set up my connection and create a subscription to the sensor data topic. This is where I populate the channel used elsewhere for data streaming.
f := func(client mqtt.Client, msg mqtt.Message) {
  datastream <- [2]string{msg.Topic(), string(msg.Payload())}
}

if token := cli.Subscribe(topic, byte(qos), f); token.Wait() && token.Error() != nil {
  logger.Error("error subscribing to topic", zap.Error(token.Error()))
  return nil, token.Error()
}
Finally, putting the data into the database is fairly straightforward. I have a lot of the structure hardcoded and may want to make this a little more dynamic later to help with reducing the coupling between what I develop on the sensor and how that data gets into Timescale. That’s a low priority item, though, as I don’t expect to see a significant amount of churn here. There are only so many ways to send the readings I’m gathering. I could plan for additional complexity, but that violates at least two of my project criteria. YAGNI indeed.
// InsertData inserts the data into the database.
func (db *Database) InsertData(reading SensorData) error {
  queryInsertData := `INSERT INTO conditions (time, mac, temp_delta, raw_temp0, raw_temp1) VALUES ($1, $2, $3, $4, $5)`

  _, err := db.pool.Exec(context.Background(), queryInsertData, time.Now(), reading.Mac, reading.Temps[1]-reading.Temps[0], reading.Temps[0], reading.Temps[1])
  if err != nil {
    return fmt.Errorf("inserting data: %w", err)
  }

  return nil
}
Results
Now, Faithful Reader, if you’ve made it this far… what does this actually look like?
{"level":"info","ts":"2022-11-27T20:49:37.475-0500","caller":"mqttwrapper/mqtt.go:43","msg":"Connected to broker","broker":"tcp://test.mosquitto.org:1883"}
{"level":"info","ts":"2022-11-27T20:49:37.565-0500","caller":"mqttwrapper/mqtt.go:65","msg":"successfully subscribed","topic":"Hotpants/data","broker":"tcp://test.mosquitto.org:1883"}
{"level":"info","ts":"2022-11-27T20:56:52.395-0500","caller":"shortshorts/main.go:77","msg":"received sensor data","topic":"Hotpants/data","payload":"{\"name\":\"90:a2:da:00:95:0f\",\"reading_idx\":0,\"temps\":[21.3125,20.6875]}"}
{"level":"info","ts":"2022-11-27T20:57:52.409-0500","caller":"shortshorts/main.go:77","msg":"received sensor data","topic":"Hotpants/data","payload":"{\"name\":\"90:a2:da:00:95:0f\",\"reading_idx\":1,\"temps\":[21.25,20.625]}"}
The logging fills up my terminal nicely and gives me an indication that things are working or not. I’ve found that the sensor stops reporting after a day or two. Power cycling brings it back online and I should really look into why that happens. I’m fairly certain it’s a memory issue on the sensor or a failure to recover from a dead MQTT connection.
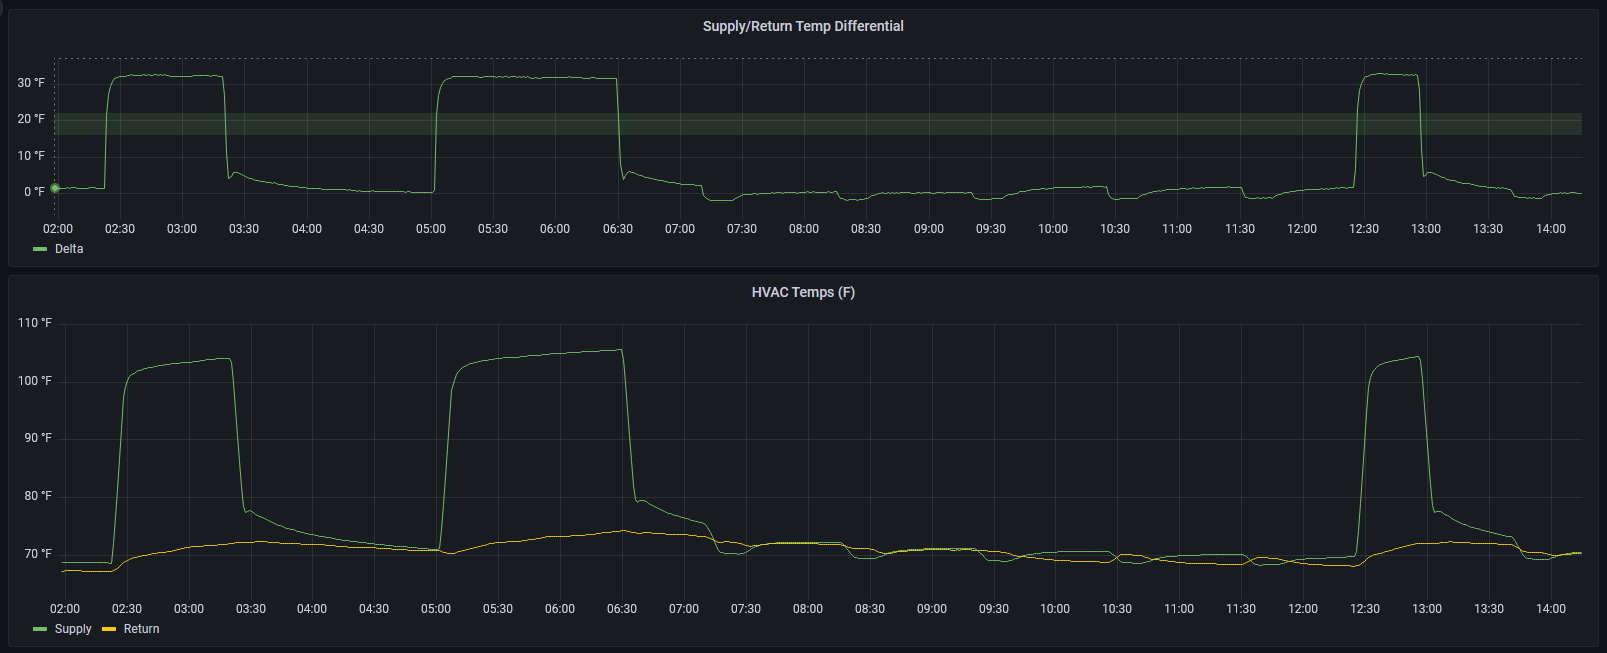
The Grafana dashboard works well and shows me the information I was hoping to see. I believe my temperature probe for the HVAC return is improperly placed and needs to be adjusted. It never really increases when the system is running. It’s likely giving a reading of the basement ambient temp instead of air temps inside the return vent. I’ll tweak it a bit while monitoring the readings to check further. The other possibility is that my system is completely hosed and I need to call the HVAC company for service.
I wonder what they’d say if I send them this dashboard output as the reason for my service request?